Sod Installation Suffolk VA: Complete Homeowner Guide
Installing new sod transforms your Suffolk property from bare dirt to a lush, established lawn in a single day. The humid subtropical climate of Hampton Roads creates ideal conditions for sod establishment, with warm summers supporting rapid root development and mild winters allowing for extended installation seasons. Success depends on proper site preparation, choosing the right grass variety for coastal Virginia conditions, and following precise installation and care protocols.
Choosing the Right Sod for Suffolk's Climate
Suffolk's location in the Hampton Roads region presents unique challenges for lawn establishment. The area experiences hot, humid summers with temperatures regularly exceeding 85°F, coupled with occasional drought periods. Winter temperatures rarely drop below freezing, but the region receives significant rainfall throughout the year. These conditions favor warm-season grasses that can handle both heat stress and periodic moisture fluctuations.
Bermuda grass stands out as the top choice for Suffolk homeowners seeking durability and heat tolerance. This variety establishes quickly in coastal Virginia's sandy loam soils and develops deep root systems that access groundwater during dry spells. Bermuda handles foot traffic exceptionally well, making it ideal for families with children or pets. The grass enters dormancy during winter months, turning brown, but rebounds vigorously each spring.
Zoysia grass offers another excellent option, particularly for homeowners prioritizing a dense, carpet-like appearance. This variety grows more slowly than Bermuda but creates an incredibly thick turf that naturally crowds out weeds. Zoysia performs well in both full sun and partial shade conditions common around Suffolk's established neighborhoods with mature tree canopy. The grass maintains better winter color than Bermuda while still providing excellent heat tolerance.
Centipede grass deserves consideration for low-maintenance applications. This variety requires minimal fertilization and tolerates acidic soils common in coastal Virginia. Centipede establishes more slowly than other options but provides consistent performance with less intervention. The grass works particularly well for larger properties where intensive maintenance isn't practical.
Site Preparation and Soil Conditioning
Proper site preparation determines sod installation success more than any other factor. Suffolk's diverse soil conditions, ranging from sandy coastal areas to clay-heavy inland sections, require specific preparation approaches. Begin by removing all existing vegetation, including grass, weeds, and debris. A non-selective herbicide application two weeks before installation eliminates persistent weeds that could compete with new sod.
Soil testing reveals critical information about pH levels, nutrient content, and organic matter percentages. Suffolk soils tend toward acidity, with pH levels often ranging from 5.5 to 6.2. Most sod varieties prefer slightly acidic to neutral conditions between 6.0 and 7.0. Lime applications raise pH levels, while sulfur amendments lower them when necessary.
Grading creates proper drainage patterns essential for sod survival in Hampton Roads' wet climate. The finished grade should slope away from structures at a minimum rate of two percent, ensuring water doesn't pool around foundations or create soggy conditions that promote root rot. Fill low spots with quality topsoil, avoiding pure sand that drains too quickly or heavy clay that retains excessive moisture.
Soil amendment improves both drainage and fertility. Adding two to three inches of quality compost across the entire installation area creates an ideal growing medium. The organic matter improves clay soil drainage while helping sandy soils retain moisture and nutrients. Work amendments into the top six to eight inches of existing soil using a rototiller or similar equipment.
Final preparation involves creating a smooth, firm surface for sod installation. Remove rocks, debris, and clods larger than golf ball size. The soil should be firm enough to walk on without significant settling, but loose enough for easy root penetration. A light watering the day before installation settles the soil and provides initial moisture for the sod.
Professional Installation Process
Sod installation timing significantly impacts establishment success in Suffolk's climate. Spring installation, typically March through May, allows full growing season establishment before summer heat stress. Fall installation works well too, giving sod time to develop roots during cooler weather before winter dormancy. Avoid installation during peak summer heat or winter dormancy periods when grass growth slows dramatically.
Fresh sod must be installed within 24 hours of harvest to maintain viability. Quality sod appears uniformly green with minimal yellowing, feels cool and moist to touch, and holds together when lifted. Avoid sod with dry edges, yellowing patches, or strong odor indicating decomposition.
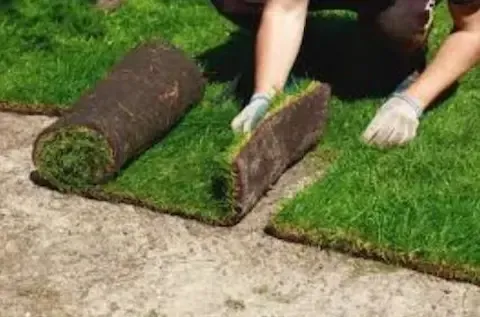
Installation begins along straight edges like sidewalks or driveways, creating clean lines and reference points. Lay sod pieces tightly together without overlapping, similar to installing ceramic tile. Stagger joints between rows like brickwork to prevent separation lines. Press each piece firmly against the soil, eliminating air pockets that prevent root contact.
Sod Installation requires careful attention to grade transitions and obstacles. Cut sod pieces to fit around trees, sprinkler heads, and landscape features using a sharp knife. Maintain consistent soil contact across elevation changes, adding or removing soil as needed. Avoid stretching sod pieces, which creates thin spots that brown quickly in Suffolk's summer heat.
Rolling the newly installed sod ensures proper soil contact and eliminates air pockets. Use a half-filled water roller, applying enough pressure to press sod firmly against the soil without creating compaction. Pay special attention to seams between pieces, ensuring tight contact that prevents drying and promotes seamless establishment.
Irrigation and Early Care
Immediate watering following installation is critical for sod survival. Apply enough water to thoroughly moisten the sod and penetrate into the underlying soil. In Suffolk's typical spring conditions, this usually requires about one inch of water applied slowly to prevent runoff. The sod should feel spongy underfoot, and water should be visible in the soil when lifting a corner of the sod.
The first two weeks require frequent, light watering to maintain consistent moisture without oversaturation. Water two to three times daily during warm weather, applying just enough to keep the sod moist. Early morning and late afternoon applications reduce evaporation losses during peak temperature periods. Avoid watering during midday heat, which can actually stress the grass through rapid temperature changes.
Root development typically begins within three to five days in favorable conditions. Test establishment by gently lifting corners of sod pieces. Resistance indicates root growth into the underlying soil. Once roots extend one inch into the soil, typically after 10 to 14 days, reduce watering frequency while increasing application amounts to encourage deeper root development.
Foot traffic restriction during establishment prevents damage to developing root systems. Keep people and pets off new sod for at least two weeks, or until roots are well established. Heavy traffic can shift sod pieces, break developing roots, and create permanent damage that requires replacement.
Long-term Maintenance and Care
Fertilization supports healthy sod establishment and ongoing growth in Suffolk's challenging climate. Apply a starter fertilizer at installation, typically with higher phosphorus content to promote root development. Follow with regular applications of balanced fertilizer throughout the growing season, adjusting timing and rates based on grass variety and seasonal growth patterns.
Mowing new sod requires patience and proper timing. Avoid mowing until the grass reaches the recommended height for your variety, typically three to four weeks after installation. Use sharp mower blades to prevent tearing newly established grass. Never remove more than one-third of the blade height in a single cutting, particularly during establishment periods when stress tolerance is reduced.
Weed control becomes important as the sod establishes and surrounding weeds attempt to encroach. Pre-emergent herbicides prevent annual weeds like crabgrass from germinating, while post-emergent treatments address existing weeds. However, avoid herbicide applications on newly installed sod until it's fully established, typically six to eight weeks after installation.
Disease prevention focuses on cultural practices that promote healthy grass growth. Proper watering, adequate fertilization, and good air circulation reduce disease pressure. Suffolk's humid climate creates favorable conditions for fungal diseases, particularly during summer months. Monitor for brown patch, dollar spot, and other common turf diseases, addressing problems quickly when they appear.
Common Installation Mistakes
Poor soil preparation causes more sod failures than any other factor. Homeowners often skip soil testing, amendment, and proper grading, leading to drainage problems, nutrient deficiencies, and establishment difficulties. The investment in thorough preparation pays dividends through faster establishment and long-term lawn health.
Incorrect watering practices, both overwatering and underwatering, stress new sod and slow establishment. Too much water creates anaerobic soil conditions that prevent root development and promote disease. Too little water causes the sod to dry out and fail to establish proper root contact with the underlying soil.
Installing sod during inappropriate weather conditions sets up failure from the start. Hot, windy days increase stress and water requirements beyond what most homeowners can provide. Rainy periods create muddy conditions that prevent proper installation and increase disease risk.
Ignoring variety-specific requirements leads to poor performance and maintenance headaches. Each grass type has specific needs for water, fertilizer, and care. Choosing varieties unsuited to your specific site conditions or maintenance preferences creates ongoing problems.
Local Suffolk Considerations
Suffolk's proximity to the Chesapeake Bay influences local growing conditions through increased humidity and salt exposure in eastern areas. Properties near the bay may experience salt spray damage during storms, requiring salt-tolerant grass varieties and periodic soil amendments to counteract salinity buildup.
The city's diverse neighborhoods present varying soil conditions and microclimates. Established areas like Harbour View and Bennett's Creek feature mature tree canopy that creates shade challenges, while newer developments in areas like Riverfront and Pitchkettle Farms often have disturbed soils requiring extra preparation attention.
Local water restrictions may impact irrigation scheduling during dry periods. Suffolk typically implements voluntary water conservation measures during drought conditions, making proper sod variety selection and establishment timing even more critical. Choose drought-tolerant varieties and plan installations during naturally favorable weather periods.
Consider consulting our Suffolk planting guide for additional information about seasonal timing and plant selection appropriate for the local climate. The Hampton Roads region's unique combination of coastal influence and continental weather patterns creates specific challenges that local expertise helps navigate successfully.
Professional vs. DIY Installation
Professional installation offers significant advantages for larger projects or challenging sites. Experienced installers have specialized equipment for soil preparation, grading, and rolling that ensures proper installation. They also understand local soil conditions and can recommend appropriate amendments and grass varieties for specific situations.
DIY installation works well for smaller areas and homeowners with landscape experience. The process requires physical labor and attention to detail but doesn't involve complex techniques beyond most homeowners' capabilities. Proper preparation and following established procedures typically produce successful results.
Equipment rental costs can make professional installation competitive for larger projects. Soil preparation requires rototilling, grading, and rolling equipment that may be expensive to rent for single-use projects. Professional crews already own appropriate equipment and complete installations more efficiently than weekend warriors.
Quality control represents another advantage of professional installation. Experienced installers recognize problem areas, adjust techniques for site conditions, and ensure proper establishment procedures. They also typically provide warranties or guarantees on their work, offering peace of mind for significant investments.
Cost Factors and Investment
Sod installation costs in the Suffolk area typically range from $0.30 to $0.80 per square foot for materials, with installation adding another $0.20 to $0.50 per square foot. Premium varieties like Zoysia command higher prices than common Bermuda grass. Site preparation requirements, accessibility, and project size all influence final pricing.
Additional costs include soil amendments, fertilizers, and ongoing maintenance supplies. Budget for soil testing, lime or sulfur amendments, starter fertilizer, and irrigation adjustments. These inputs represent essential investments in long-term lawn success rather than optional extras.
Compare sod installation costs to seeding alternatives considering establishment time and success rates. While seeding costs less initially, the extended establishment period and higher failure rates often make sod the more economical choice for homeowners wanting immediate results.
Long-term maintenance costs vary significantly between grass varieties. Low-maintenance options like Centipede grass require minimal fertilization and care, while high-performance varieties like Bermuda need regular inputs to maintain peak appearance. Consider ongoing costs when selecting grass varieties and installation approaches.
